How to highlight Start Center Result Set with color

Highlighting work orders or service requests with color based on their priority and due date is a common requirement. While it is easy to implement this in the applications, it is harder to achieve with Start Center result sets as the functionality is quite limited.

I have seen this question pop up a few times in various forums but there hasn’t been a detailed instruction posted on the Internet. Hopefully, this post can provide enough details for the non-technical consultants to implement this for their clients.

I will demonstrate the steps to implement this with a simple requirement. A customer wants to display a list of Service Requests and highlight them in color as follows:

  • Priority 1 – Urgent: if the age of the SR is less than 30 minutes, display it as Green. If the age is less than 2 hours, display it as Orange. And if the age is higher than 2 hours, display it as Red.
  • Priority 2 – High: Green for less than 2 hours, Orange for less than 8 hours, and Red for more than 8 hours
  • Medium/Low: Green for less than 1 day, Orange for less than 3 days, and Red for more than 3 days

The functionality around color coding for Start Center Result Set is quite limited:

  • The expression is limited to a few simple operators such as Less Than, Equal, and Greater Than. And there is no option to use Conditional Expression.
  • The condition must be based on a field displayed on the result set

To workaround this limitation, we can use a non-persistent field, for which, we can use Formula or write an automation script to initialize a value based on a complex logic. The steps are as follows:

Step 1: Use the Database Configuration app, add a new field to the SR object, then Run Apply Configuration Changes

  • Attribute Name: COLORCODE
  • Data Type: Integer
  • Persistent?: Unchecked

Step 2: Use the Object Structures app, create a new object structure:

  • Object Structure: RPSR
  • Consumed By: REPORTING
  • Source Objects: add the SR
  • Use Exclude/Include Fields action: include the COLORCODE non-persistent field.

Step 3: Use the Automation Scripts app, create a new Script with Attribute Launch Point:

  • Launch Point: COLORCODE
  • Object: SR
  • Attribute: COLORCODE
  • Events: Initialize Value
  • Script Name: SR_COLORCODE_INIT
  • Language: Python
  • Source:

Step 4: Edit the Start Center template, add a Result Set to the Start Center, then edit it:

  • Application: SR
  • Query: All Service Requests (or select any Saved Query you want to use)
  • In the Object List, ensure to select Object Structure created in the previous step
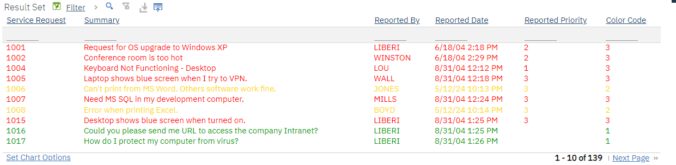
  • Add the fields you want to display. In this case, I added Service Request, Summary, Reported By, Reported Date, Reported Priority, Color Code. Note that the new non-persistent field Color Code must be added
  • In the Color Options tab, set up the 3 color options as depicted in the image below.

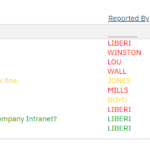
If everything is set up correctly, the Start Center Result Set should display values in the Color Code column, and the records should be highlighted in the right colors

Troubleshooting:

  • If the Color Code field does not display a value, need to check the automation script which is responsible for initializing the value for the field
  • When adding fields to the Result Set, if the Color Code field is not there, it is because the custom object structure is not selected. By default, the Result Set will always have a “Service Requests” item in the object list, even if there is no Object Structure of type REPORTING created. If you have multiple object structures for the SR object, you can give the object structure a specific description to easily identify it.
  • After deploying the Start Center to production, there could be various issues that prevent it from displaying properly, please refer to my previous post for more details on how to troubleshoot it.

Must-know tips & tricks to improve data entry efficiency in Maximo

A client recently asked me for a solution for importing fuel consumption data. Each day, their operators would refuel about two hundred cranes and vehicles. They enter the data in an Excel file hosted on SharePoint. The finance team has to manually key the data into Maximo from these files. The process takes a few hours each week. The client asked if we could build some integration or custom app that can automate the process.

After looking at various more complex options, we ended up using Maximo’s standard import function. The accountants have to copy and paste the data from Excel to a defined template and then import it into Maximo. The time it takes was reduced to a few minutes. Everyone is happy. The Maximo administrator is happy because this is a maintenance-free solution. The accountants are obviously happy as this helps with one of their most tedious tasks. Neither the finance team leader nor the Maximo administrator were aware of this standard capability. They started discussing applying it to applications like Purchase Orders and Invoices. From a few other recent conversations, I realised many Maximo users are not aware of some basic but useful features and tools. This post hopefully will help close some of this gap.

Import/Export function

We can upload/download almost anything using the standard Import and Export functions. They are not enabled by default in most applications as they require some configuration. As such, most Maximo users are not aware of this. In the cases where the Import/Export feature is being used, the users often don’t know how flexible this can be configured to address complex requirements. We can even customise the inbound/outbound processing rules to perform data transformation. 

As an example, for the above scenario, I set up a template that has almost the exact columns as the current Excel data file the operators are using. This allows the accountants to copy/paste the data from the Excel file to the import template in just a few clicks.

For more details about this function, you can refer to the video below from Starboard Consulting:

Default Insert Fields

This is the feature I love the most in Maximo. Unfortunately, I found it is not used in most companies I had the chance to work with. Earlier in my career, when I did a lot of greenfield implementations, this was the first thing I talked about when discussing screen design. It is so useful that it helped minimise a lot of resistance from the procurement and logistics users when Maximo was introduced to them. When creating a Purchase Requisition or issuing material, the data fields are usually repetitive.

For example, in a material issue transaction, the lines usually have the same charge details like work order, asset, and GL account. By putting these details in the default insert fields, the user will only have to enter the item number and quantity for each line. You can refer to the short demo below to see how it works:

“Stupid” Smart Fill / Type-Ahead / Asynchronous

In Maximo, there are various features we can tweak to increase data entry speed. Some of them are:

  • Smart-Fill: for a look-up field, such as Item Number, if you type BEAR, and there is only one item that matches the first few characters, such as BEARING1001, it will fill the whole value for you. However, the issue is when you type an exact item number, if there is more than one option that partially matches the word, it will show a magnifying button, forcing the user to click and select. This means the user has to move his/her hand between the keyboard and the mouse. By turning “Smart Fill” off on a field, it accepts the exact value you entered without questioning. I once helped turn this off on the Bin Number field for the Inventory Issue/Transfer screens. It only took a minute to make the change, but it made the user “exceedingly happy”. That exact word she used when giving feedback to my boss. Below is a quick demo of the difference when turning “Smart Fill” off:
  • Type-Ahead: after typing a few characters, Maximo will show a list of available options for you to pick from. This needs to be configured to work.
  • Asynchronous Data Validation: after updating a field, the user can move and update the next field instantly without having to wait for the server to validate the data. However, the validation is almost instantaneous in most cases, and there is no benefit from this feature. On the other hand, after entering an invalid value, the user has to update another field to see the error message. This is actually can be counterproductive and annoying. The key takeaway here is that if you don’t like this behaviour, we can easily turn it off locally for certain fields, or for the whole system. 

Bulk Apply Change

Many good applications provide the user with the capability to bulk-apply changes to multiple records. Unfortunately, Maximo doesn’t provide this as a standard feature. The good news is it’s easy to implement this bulk-apply function to the List screen. In the past, this required some Java customization. In newer versions, we can set it up with Automation Script. Below is an example of how it can be implemented to mass update work order scheduling details. This is probably the most common requirement for bulk updates in Maximo. I built this to demonstrate this point which took me less than 30 minutes by following this excellent tutorial.

MXLoader

MXLoader is a data upload/downloading tool written by Bruno Portaluri. It runs on top of Excel and is free to use. In case you don’t know what it is, below is a short introduction video. The only complaint I have about this tool is that it is too powerful. With MXLoader, we can update almost anything in Maximo. This can be a concern in terms of data security and integrity. Since it’s too easy and fast to mass update data, the damage is multiplied when the user makes a mistake. Other than that, for data entry, nothing beats the efficiency of feeding data directly from Excel to Maximo.

Conclusion

This post does not introduce anything new. My goal is to remind you that if you are a Maximo user who has to do a lot of data entry, speak to your Maximo support people. There are simple tricks they could do to improve your experience. If you think data entry in Maximo is a pain in the neck and they don’t have an answer, shout at them, bully them, or threaten to fire them. People often find creative solutions under pressure. Cutting down a few clicks doesn’t sound like much, but if you have to enter a few hundred lines of data, it can make a big difference. If you have any other data entry problem that can’t be addressed by the tricks mentioned above, please share in the comments. I will see what else can be done to address it.

How to approve workflow via email using automation script?

Maximo has an Email Listener and an Email Interaction application. I have seen the Email Listener being used quite effectively by some clients despite having some annoying bugs that require fixes using custom Java code. I haven’t seen the Email Interaction app used in a real production environment. Recently, I attempted to use the two applications without success. I ended up writing a simple email listener using Automation Script instead. This post outlines the detailed steps here in case someone will need it in the future.

Requirement

A major port uses workflow for their purchase requisition approval. The first-level approvers are first-line supervisors who often work in the field and do not have access to a computer most of the time. This causes some delays in the approval process. They asked if they could reply to an email from their mobile phones to approve the workflow assignment instead.

Analysis

To address this requirement, my first solution was to include two hyperlinks at the end of the workflow assignment emails. In the client’s current workflow, when a new PR is submitted to a supervisor, he already gets an email notification from Maximo. We can add at the end of this email an Approve and a Reject link which will trigger the respective action. However, this approach requires the user to enter a username and password to authenticate for Maximo to work. While we can hard-code the API key in the hyperlink, or remove the authentication requirement, it is unacceptable for security reasons.

My next solution was using the Email Interaction and Email Listener application. I followed this instruction provided by IBM. The article is quite detailed, however, it misses a few key pieces of information for which, I had to decompile the code to figure out. Despite that, after spending 8 hours, I couldn’t get it to work for this simple scenario. There were two issues:

  • Email Interaction didn’t seem to populate the record ID correctly
  • Email Listener cron gave me a NullPointerException error without any other intelligence to troubleshoot.

It looked like I needed to debug and write some Java custom code to address those issues and it will likely take another day at least. I decided to write a simple email listener instead. Below is the solution that I came up with.

Solution

Note: For this example, I used the standard Maximo Demo instance. It already has a simple approval workflow named “PRSTATUS

First, I duplicated the standard WFASSIGN communication template to create a new template and named it PRAPPRASSIGN. I added the @@:OWNERID@@ placeholder to the email subject and added some additional instructions at the end of the email.

Duplicate and create a new email template with an ID placeholder in the subject

For the PRSTATUS workflow, I edited the SUP_APPR assignment node to enable sending emails when new assignments are created and set it to use the communication template created in the previous step.

Enable email notification on workflow assignment

As you can see, there is no crazy configuration here. The workflow will work exactly like before. The only change is the email sent out will also have a Record ID in the subject. When the user replies to the email, Maximo will use the ID to identify which PR record to approve.

The next step is to build a simple email listener. For testing, I created a new Gmail account and enabled App Password so it can be accessed from Maximo.

I created an Automation Script with the source code below and set up a cron task to execute it every 5 minutes. This simple script uses Java mail client library to access Gmail, and finds any unread emails that have an ID in the subject. If it can match the ID with a PR record that has an active WF assignment, it will approve or reject the request if the reply is 1 or 2 respectively. It also does a simple check to make sure the sender’s email matches the assignee’s email before routing the workflow.

Usage:

To test this, I set account Wilson to be Maxadmin’s supervisor and set Wilson’s email to be my own email. Then, with the Maxadmin account, I picked a PR in the WAPPR status and routed it through the workflow. The record was assigned to Wilson, and a notification was sent to my email inbox. To approve the assignment, I replied “1”. After a few minutes, Maximo Crontask will kick off the Automation Script which reads the reply and approves the workflow. As mentioned earlier, we can still use account Wilson to route and approve the workflow in Maximo. There is no change to the process.

View Workflow History after PR has been approved by email

How to override HTTP headers for integration end-point with Automation Script?

For the HTTP End-point, we can set a fixed value in the request header. This doesn’t work for header values that must be generated on the fly like authorisation tokens. To override the headers of an end-point during runtime, the traditional approach is to write some custom Java code. This post explains how we can avoid Java by using an automation script end-point instead.

To illustrate the approach, I will use an example of an interface between Maximo and an application on Azure via the Azure Event Hubs. The API requires a SAS token to be provided in the request’s header.

First, we will create an automation script end-point by following this tutorial by Alex at A3J Group:

  • Create an end-point:
    • Name: AZEVENTHUB
    • Handler: SCRIPT
    • Script: AZURE_EVENTHUB_ENDPOINT
    • Note: As explained by Alex, the SCRIPT handler is available OOTB from 7.6.1.1. From versions between 7.6.0.8 and 7.6.1.1, we’ll have to manually create a handler that utilises the java class: com.ibm.tivoli.maximo.script.ScriptRouterHandler
  • Create an automation script:
    • Name: AZURE_EVENTHUB_ENDPOINT
    • Language: python
    • Source Code:

This is a bare minimum example. When the publish channel sends data to this end-point. It will call the automation script, which sets a Content-Type header and sends the payload (implicit variable requestData) by invoking an HTTP Handler.

In this case, we’ll use Webhook.site to test my request. To do it,  we’ll quickly set up a publish channel named AZWO from the standard MXWO object structure as follows:

Then we’ll set up an external system named AZEVENTHUB as follows:

To confirm the end-point is working, we update a work order. As a result, we should see a message posted to Webhook as follows:

Now to get this end-point to work with Azure Event Hub, we’ll have to populate a “ContentType” and an “Authorization” header for the request following the examples by Microsoft on how to generate SAS token. To avoid having to import third-party libraries to Maximo, when there is no suitable OOTB python library available, I’ll use Java code instead. Below is the source code for the end-point:

To test it, we’ll make another update to a work order. On webhook, we should see the result as follows:

How to export data to Excel using Automation Script?

Earlier I provided an example of how to extract and send data as CSV to a user via email. A friend asked me about a requirement he is dealing with. In this case, he has an escalation which sends an email when there is an error with integration. The problem with this approach is if there are many failed transactions, the administrator will receive a lot of emails. The alternative approach is setting up a scheduled BIRT report which lists all errors in one file. However, this approach also has a problem. On the days when there are no failures, the admin would still receive an email and still have to open the file to see whether there is an error or not.

This is actually a very common requirement. Below are some examples:

  • Operation managers like to monitor a list of critical assets. Maximo should send out a maximum of one email per day with the list of active SR and WOs when the asset is down. Do not send emails if there are no issues.
  • Operators like to receive a list of all high-priority work orders reported daily in one email, such as work orders that deal with water quality issues or sewer overflow.
  • The system admin wants to get a list of suspicious login activities daily.
  • System owners like to monitor data quality issues. Only send out a report if there are issues.

Below is an example of how we extract all P1 work orders in site BEDFORD, and save the data to an Excel file. I didn’t include the code to attach the file and send out an email as it has already been provided in my previous post

As usual, I test the script by calling it via API. Below is how the data looks when opened in Excel.

For data aggregation or when complex joins are required, we can also run an SQL query to retrieve data. Below is an example that provides a list of locations and the total number of work orders for each location.

Below is the data exported by the script

How to send email with CSV attachment using Automation Script

A client asked me to set up Maximo to automatically export work order data in CSV format and send it out via email. Initially, I suggested using the scheduled report function. We can build a simple BIRT report which has one data table. It can be scheduled to run automatically and send out an email with the data attached in Excel format. The user will simply have to open the file and save it in CSV format.

The solution was not accepted due to two reasons:

  • It involves some manual intervention.
  • BIRT Excel format has a limitation of 10,000 rows. If there are more rows, the data is split into multiple worksheets.

To address this requirement, I wrote an automation script that does two things:

  • First, it fetches the MboSet and generates the CSV content using the csv library.
  • Send an email with the CSV file attached.

Below is the simplified version as an example. It works with the OOTB Maximo demo instance. Notice that the csv python library I used was included in Maximo out-of-the-box but it is not available to autoscript by default. Thus, we have to append the Lib folder to the library path at line 7.

I created it as a script without a launch point:

To confirm that it works, I call the script by accessing this URL from the browser:

Once confirmed working, I created a cron task to run the script on a schedule. We can also modify this script to address some simple file-based integration requirements by changing the delivery method to SFTP or HTTP POST.

Update: We can also use Apache POI library (included in Maximo OOTB) to export data in Excel format and send as email attachments

ArcGIS to Maximo synchronisation not working due to API limit

How to send ArcGIS data to Maximo

This is a weird issue with the ArcGIS – Maximo integration cron task. I like to record just in case it hits me again. 

Symptom:

The client reported the Maximo – ArcGIS Asset integration stopped working. New assets are not synchronised from GIS to Maximo by the ArcGISDataSync cron task. The history of the cron task instance shows an error: BMXAA6361I – caused by: BMXAA1482E – The response code received from the HTTP request from the endpoint is not successful. Not Found

If I copy and open the same REST query of the cron task instance from a browser, ArcGIS does return data with HTTP response Code 200 – OK, the response JSON data looks normal. 

However, the GIS specialist advised me that the request exceeded ArcGIS’s API limit was set at 2000. When inspected closely, there is an attribute “exceededTransferLimit”: true at the end of the JSON response. In this case, the feature layer contained more than 5000 records in the updated state that met the request’s filter criteria (MXCREATIONSTATE=1)

Cause: 

To confirm the GIS limit caused the issue, we increased it to 10,000. The cron task ran without error after that. It is unclear how Maximo captures this error message; whether it read the JSON message looking for the exceededTransferLimit attribute or whether Maximo received a different HTTP status code from ArcGIS. We didn’t have time to debug Maximo’s code to find out.

Solution:

To fix the issue in this case, we resorted to a short-term solution, which is increasing the limit to 10,000 to clear the batch. Then we reset it back to default as it wasn’t expected to have more than 2,000 features updated/created per day.

For the long term, I proposed two options:

  • Option 1: increase the limit to 10,000 or higher permanently. I don’t think it causes much stress to the servers. If we have more than 10,000 updates per feature layer per day, it will still fail.
  • Option 2: Set this layer/cron task instance in Maximo to run more frequently (i.e. hourly). This is processed by the background JVM and won’t cause performance degradation to the end-users. When the cron task runs but does not get any result, it doesn’t consume much resource anyway. However, this approach won’t help if we have a large batch update in a short period (e.g. manual data import or bulk update).

Send HTTP Request from Automation Script (Improved version)

In an earlier post, I talked about how to use Automation Script to send an HTTP request by invoking a pre-configured End Point. That approach has some flexibility as we can override various properties during runtime like URL, Headers, or HTTP Method. Despite that, it is still quite limited and only suits simple scenarios.

In a recent task, I had to port an ArcGIS interface from Java to Autoscript. I improved the approach a little bit to address this real-world requirement. I document the simplified version here as it can be handy for me in the future. I hope that it is useful to some of you out there too.

Note: I use Webhook.site to test the code. It is free to use. If you like to test the code yourself, you will need to visit the site first to generate your own Webhook URL

Acquire a unique URL from webhook.site

Example 1: GET Request

I need to send a request to ArcGIS to get details of a Control Valve. It is a simple GET request with some parameters. Below is a basic example.

I created this as a script on the Asset Save launch point. It lets me to trigger the code easily by updating an asset record. When a request is sent to Webhook, it shows the request details including Parameters and Headers. Notice that in this case, it correctly decoded the basic authentication to a username/password pair for the MAXADMIN account.

Inspect Parameters and Headers of a request

Now, if I update the URL to point to a sample ArcGIS online server as in the code below, I can retrieve the details of an asset.

Below is what we see in Maximo.

Show response details in Maximo

Example 2: POST request with form data

In this example, I want to send a Service Request to ArcGIS. To add or update a feature, we need to send a POST request and the content should be in form-data format. Below is a basic example. It includes building a JSON object, converting it to string, and then sending it in form-data format.

I created it as a script on the “Save” event of the “SR” object. In this initial version, we send it to Webhook first to ensure the request is formatted correctly. As shown in the screenshot below, the form data is read correctly.

Inspect to ensure form values can be parsed from request body

Now to make it real, I updated the code to send it to ArcGIS online server. In this case, I hardcoded the coordinate value to the Naperville  City Hall. Determining the X and Y coordinate of a Service Request based on Asset or Location is out-of-scope of this post.

To trigger the script, I update a random Service Request in Maximo. If a new feature is created successfully, we will get a message with an Object ID as follows.

Show Object ID of the new feature in Maximo

We can open ArcGIS Online map, zoom into the area near Naperville City Hall and we should be able to see the new SR as a green point on the map

Service Request is created in ArcGIS Online

Resize photos when uploading attachments to Maximo

In recent years, there has been a surge in the adoption of mobile solutions for Maximo. For many companies, the use of mobile apps is no longer restricted to the work execution process. Processes like raising service requests or carrying out field inspections have become mainstream. These use cases often involve uploading a lot of photos taken directly from the phone with high-resolution cameras. This leads to high demand for attachment storage. The time and bandwidth required to view large files via mobile network is also a concern.

Often, high-resolution photo is not needed and we want to resize the file to address this problem. Unfortunately, Maximo doesn’t have this functionality supported out of the box.

Asking the end-user to resize large photos before uploading is not practical. It is our job to make it easier for the user, not make it harder. I have seen different clients having different approaches to keeping file sizes small. But they often involve Java customization which I don’t like.

The best approach is to resize the photo in the mobile application before uploading. But it is dependent on whether the mobile solution has the functionality or can be customized to do it.

The simplest solution I have is to use an automation script to resize a photo when uploading. All we have to do is create an Automation script on the Save event of the “DOCLINKS” object with the bit of code below:

Hope this helps.

How to integrate ChatGPT with Maximo?

Ever since ChatGPT’s release, I’ve been contemplating how to leverage large language models (LLM) to enhance legacy applications like Maximo. Given the ability to engage in a conversation with the machine, an obvious application is to facilitate easy access to information through semantic search in the Q&A format. To allow a generic LLM model to respond to inquiries about proprietary data, my initial thought is fine-tuning. However, this approach comes with several challenges including complexity and cost.

A more practical approach is to index organisational data and store it in a vector database. For instance, attachments (doclinks) can be divided into chunks, indexed, and kept in a vector database. When asked a question, the application would retrieve the most relevant pieces of information and feed them to an LLM as context. This enables the model to provide answers with actual details obtained from the application. The key advantages of this approach include:

  • Low cost
  • Realtime data access
  • Traceability

Last month, OpenAI introduced the function calling feature to its API, providing ChatGPT with an additional mean of accessing application data. By furnishing it with a list of callable functions, ChatGPT can determine whether to answer a question directly or execute a function to retrieve relevant data before responding. This powerful feature has generated some buzz among the development community. After trying it out, I was too excited to ignore it. As a result, I developed an experimental Chrome extension that enables us to talk with Maximo. If you’d like to give it a try, you can find it on the Chrome Web Store under the name MaxQA.

How it works:

  • This tool is purely client-based, meaning there is no server involved. It directly talks with Maximo and OpenAI. To use it, you will need to provide your own OpenAI API key.
  • I have defined several basic functions that OpenAI can call. They work with Maximo out of the box. 
  • You can define new functions or customize existing ones to allow it to answer questions specific to your Maximo instance. To do this, right-click on the extension’s icon and open the extension’s Options page.
You can your own functions for ChatGPT to query Maximo and answer your question
  • The app uses OpenAI’s “gpt-3.5-turbo-0613” model, which is essentially Chat GPT 3.5. As a result, you can ask it any questions. For general inquiries, it will respond like ChatGPT 3.5. However, if you ask a Maximo-specific question, OpenAI will direct the app to execute the appropriate function and provide the necessary input parameters. The data response from Maximo will be fed back to OpenAI, which will then generate an answer based on that data.

sequence of integration between OpenAI ChatGPT and Maximo

Through this exercise, I have gained a few insights:

  • Hallucination: while the inclusion of actual data reduces the likelihood of hallucination, there are still occasional instances where it provides convincing false answers. We can address this with prompting techniques such as instructing it to not make up an answer if it does not know the answer. Nonetheless, this remains an unsolved problem with this new technology.
  • Fuzzy logic: consistent formatting of answers is not guaranteed for identical questions asked multiple times. This can be considered unacceptable in an industrial setting.
  • The 4k token limit: the API’s 4k token limit proved to be quite restrictive for the results of certain queries. The screenshot below is a response file that’s almost hitting the limit. The file contains about 10k characters.
a file with 10k characters which nearly reach the 4k token limit
  • The importance of description: more detailed description improves the accuracy of the model when selecting which function to call. For instance, for the function that provides asset details, I initially described it as “Get details of an asset record by AssetNum”, OpenAI correctly call this function when asked: “What is the status of asset 11450?”. However, it couldn’t answer the question: “Are there any active work orders on this asset?”. Until I updated the description of the function to “Get details of an asset record by AssetNum. The result will show a list of all open/active work orders on this asset and a list of spare parts”, after which it was able to answer correctly.

In conclusion, despite several limitations, I believe integrating LLM with an enterprise application offers immense potential in addressing various use cases. I am eager to hear your thoughts on potential applications or suggestions for new experiments. Please feel free to share your thoughts in the comments. Your input is greatly appreciated.

« Older posts

© 2024 Viet Tran's Blog

Theme by Anders NorenUp ↑